.NET Compiler Platform, better known as Roslyn, has been one of the best things that happened to C#. In short, it is a compiler made with IDE integration and extensibility in mind. It provides us with hooks to add our own analysis and transformations to the process of compilation. Why is that important? If there was ever a coding rule specific to just one of your projects, that you had to inforce with lots of discipline and diligence, but would rather rely on the compiler for it, or a routine operation you could easily automate if only you could write an IDE extension – Roslyn will make this a reality. It allows you to write code, C# code in my case, that will run as a Visual Studio extension, analyze the code other devs are working on and help them modify it.
Unfortunately, despite initially releasing with Visual Studio 2015, there is still lack of tutorials teaching how to do things beyond ‘Hello world’. For serious development, the best way to learn is to read official documentation wiki and study other prjects available on github - quite a lot of overhead, even if Roslyn is worth it. This series will provide with a more streamlined roadmap - enough knowledge to do useful things and guidelines for farther research. Through the series we will build a refactoring extension for Visual Studio and a simplistic analyzer dll to include into a project. Both small enough to comprehend in an hour, yet performing useful work, solving a task the likes of which you may expect to want to automate yourself in your project. As well as techncial infromation, which can be quite overwhelming at first site, I will try to give hints on the general flow of Rolsyn development: how to decide where to start, how to deal with roadblocks, how to concentrate on important things first.
Analyzer and Refactoring are 2 most often use-cases for Roslyn. Both inherit a corresponding base class with methods for us to overload. In both cases our overloaded methods will receive a graph representation of the code that a developer is working on in his IDE and allow us to notify them possible problems in that code as well as offering solutions to them, or just typical refactoring actions.
To distinguish between code of our Roslyn extension itself and the code being analyzed, we will call them "roslyn-code" and "subject-code".
Refactorings are activated once a developer clicks a certain part of code (i.e. type name, method name etc.). They will be provided with the context of the click to determine if the piece of code clicked is something they can work with, in which case they will return several possible code transformation options. The context they are given contains graph resulting from Syntactic analysis of the code. In the course of this tutorials cycle we will be dealing with a refactoring that regenerates a class constructor with new added code when a class declaration or one of its constructors is clicked.
Analyzers look for problems with code. Their role is to inforce rules that go beyond "this code compiles". The context they are given contains graph resulting from Semantic analysis of the code. They can be style-cop like rules of spacing and new-lines, or more advanced rules, like detecting and prohibiting use of raw SQL strings in your repository level. They produce diagnostics results that may have a severity of warning or even an error. They can also calculate the subject-code changes that would solve the problem and apply them in one click. In short: “scan all code” => “detect problem” => “highlight it and provide fix”. Our analyzer will detect problematic public method signatures in Web Api controllers - make sure they never return void.
Notice the distinction betwwen Syntactic and Semantic analysis in previous paragraphs. More on them later.
🔗 Workspace, Syntax Graph, Symbol Graph
The most important thing about Roslyn is the Workspace it provides you with. It is represented by an immutable graph data structure that spans the entirety of solution being worked on. Roslyn gives you access to every part of your solution that would be needed to compile it, starting with the projects it contains => into the files they contain => into the code syntax graph contained inside every file.
Let the code speak for itself for clarity. Let’s say you want to analyze a piece of code with Roslyn. You will need to create a simplistic workspace for that:
using DiConstructorGeneratorExtension.Attributes;
using Microsoft.CodeAnalysis;
using System.Linq;

namespace DiConstructorGenerator.Test
{
    public static class TestUtil
    {
        public static AdhocWorkspace
                            CreateAdHocLibraryProjectWorkspace(
                                        // our file contents
                                        string classFileContets)
        {
            return CreateAdHocLibraryProjectWorkspace(classFileContets,
                  // mscorlib
                  MetadataReference.CreateFromFile(
                      typeof(object).Assembly.Location),

                  // one of our own dlls we want to reference
                  MetadataReference.CreateFromFile(
                      typeof(InjectedDependencyAttribute).Assembly.Location));

        }

        public static AdhocWorkspace
            CreateAdHocLibraryProjectWorkspace(
                                    string classFileContets,
                                     params MetadataReference[] references)
        {
            var referencesCopy = references.ToArray();

            var resultWorkspace = new AdhocWorkspace();

            Document document = resultWorkspace
                .AddProject("MyProject", LanguageNames.CSharp)
                .AddMetadataReferences(references)
                .AddDocument("Class1", classFileContets);

            return resultWorkspace;
        }
    }
}
That is it. You can think about it as a headless (actual UI does not render) simplistic IDE that you can control with code. It allows you to examine syntax graphs of the code in its files (or in our case in-memory representations of files), produce Compilations and modified versions of this code to be offered to developer as fix for detected problem or refactoring. You have also noticed from the namespaces, that we will later use this code to unit test our Roslyn-code.
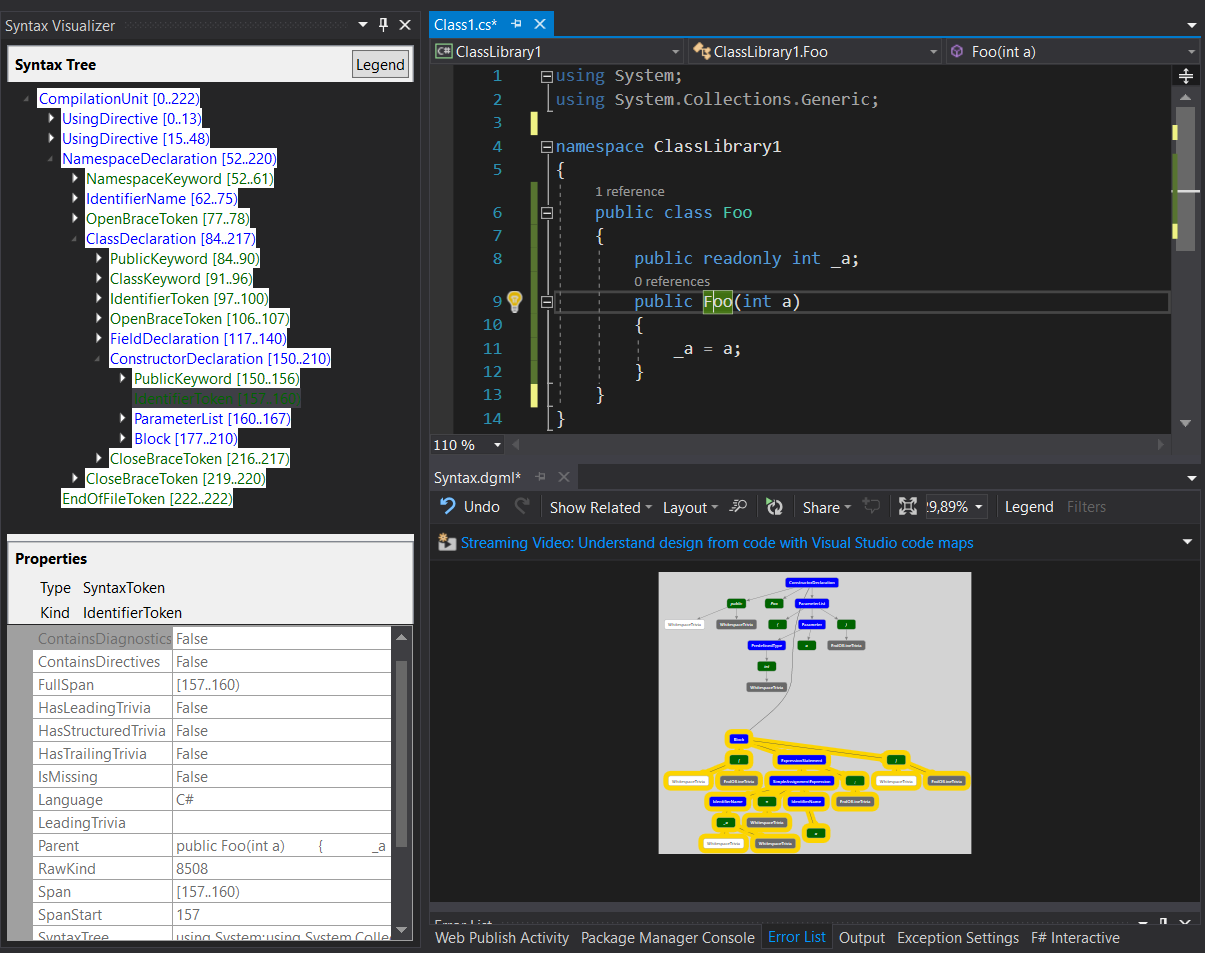
Now you can examine the code syntax graph of the file text you’ve used to create workspace. Luckily for us, Roslyn comes with a great visualization tool, Roslyn Syntax Visualizer . If you are using Visual Studio 2017, there is a good chance it is already installed. If you don’t want to install entire Visual Studio just to check it out – it is also built into version 5 of LINQPad, which has a free edition. (Choose "C# Program" for "Language" option, paste your code, hit F5 and choose the "tree" tab)


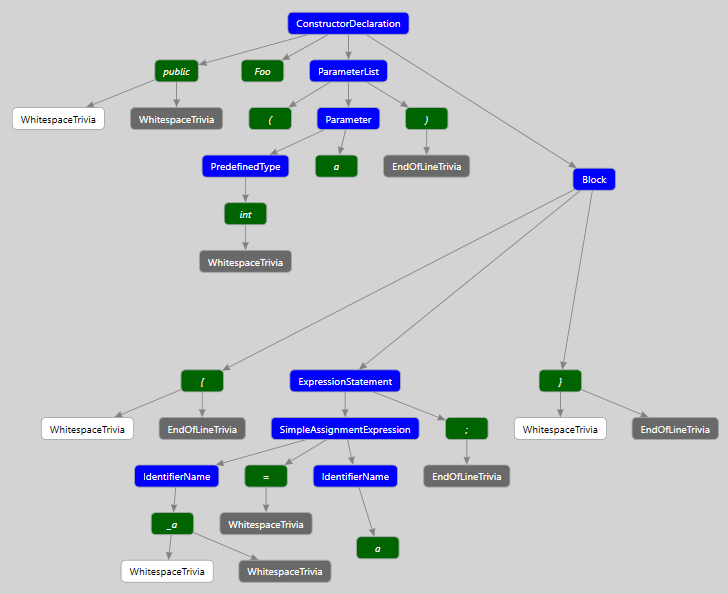
This syntax tree represents the simple 1-line constructor of your class as seen by the compiler. Blue color marks nodes – they correspond to the meaningful higher-level concepts of C# language like type and member declaration, statements, etc. Notice, how they always contain children like tokens. Green color marks tokens – they are delimiters, modifiers, identifiers, etc. used with your nodes. White and Gray color marks trivia (white - leading, gray - trailing) – whitespace, line brakes, comments and everything that does not matter for the actual compilation process, but does matter for the developer. One thing to note here are identifier tokens – they represent names that are not part of core C#, i.e. names given to things by application developers. This includes things like variable names inside methods, type names, their member names, etc.
This graph is a faithful representation of your code text. Every character is part of some token or trivia within some node. And every node, token and trivia has a “span” property maintaining info about the exact span of original text that is represented by them. Spans can be of 0 length when a node or token represent something that was omitted.
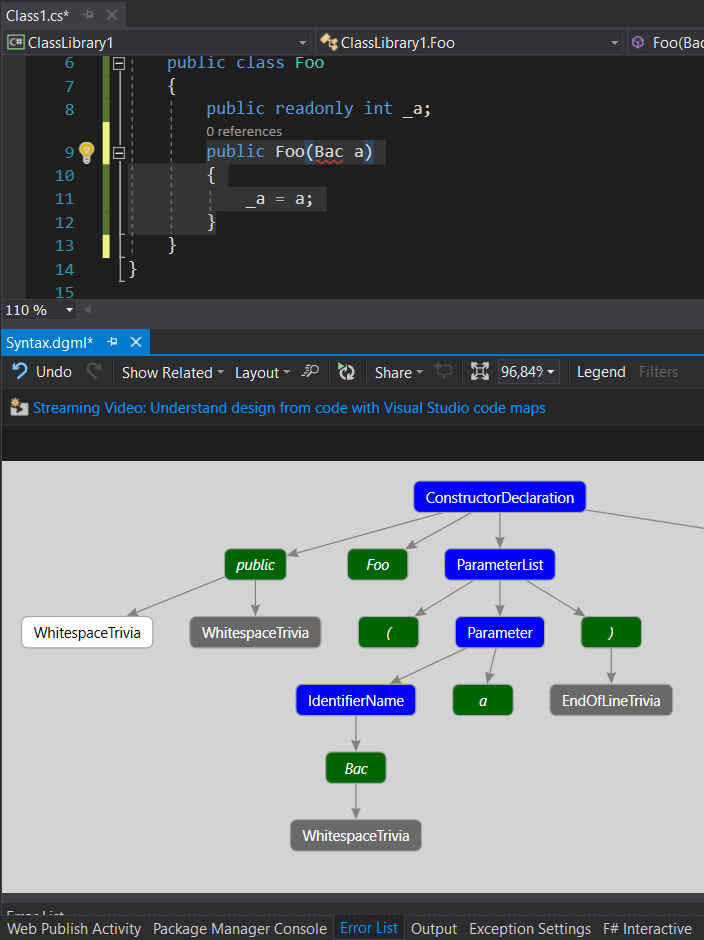
It is important to understand, that you are dealing with one of the initial stages of compilation – Syntactic analyesis, parsing. This syntax tree you are dealing with is just one step above plain text. This means, that the compiler has already determined "what is what" in terms of structure of code, for example, separated C# language keywords from Type and member names. But it did not yet check, if this names correspond to something that actually exists in solution. For example, let’s switch parameter type to a random word. As you can see, Visual Studio gives us an error, pointing to non-existent type name, but the syntax graph is okay with it.

Because of this, all information initially available to you from the graph is essentially textual, i.e. you can’t easily get a type symbol reference from a parameter, for example, if you want to examine all references to this particular type in the solution. This would need information from a later stage of compilation – Semantic analysis, binding.
Parsing text is relatively cheap in terms of computation power, and fast. Binding, on the other hand, is expensive - you have to resolve text identifiers to symbols located through all of you solution. Imagine, checking if a Type by the name ‘Bac’ actually exists – you’d have to check every using statement in the current file to determine open namespaces and then check each one of them for having this Type, and that there is only one candidate in the end (and don't forget, Types can have alyases within a file like "using Bac = System.BacSpecificLongName;").
As mentioned, Analyzers receive a bound Symbol graph, whereas Refactorings only receive the Syntax graph. It is possible to instruct Roslyn to bind Syntax graph on demand, but it may slow your Refactoring down, so you have to have a very good reason to do it. Remember, refactoring, unlike analyzer, is activated by developer’s direct and willful action. Hanging IDE is not the result they want. More information on the binding process in Roslyn and semantic analysis is available here Roslyn Wiki
🔗 Setup
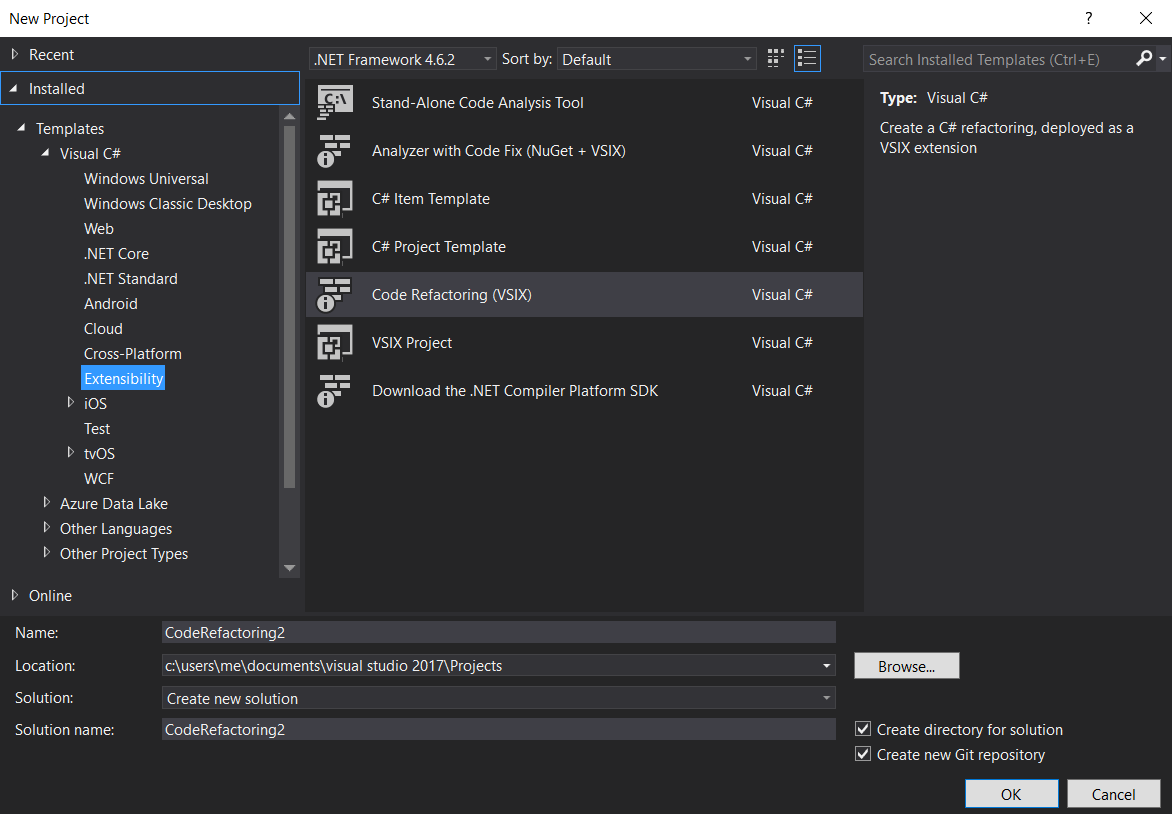
By now you understand, what the goals of Roslyn are and how it achieves them. Let’s start working on our extension. First, you need to install the templates for Roslyn. A quick tutorial on how to do this is available from Josh Varty blog. He has an excellent series of articles dedicated to different aspect or Roslyn, which I urge you to read if you want to know more of it.

We will start by creating a Code Refactoring extension. This will be useful, because the template for it does not have testing code included (at least the one I have doesn’t) and we will create this structure by ourselves. Paraphrasing Richard Feynman, "What I cannot unit test, I do not understand", so we will learn to unit test Roslyn. The final form of the extension we will be testing is available in Visual Studio Gallery, and its code is available on github. The extension in question allows us to add missing dependency property injection to our constructor in one click.
Once you’ve created a solution – you will have two projects – one for a library contacting your extension, and another with a ".vsix" Visual Studio extension using it. You have to add a third project for unit tests, using whichever framework you prefer.
With a refactoring, our unit test comes down to “we have initial code X” => “we click a certain element and choose our refactoring” => “we have transformed code Y, which we compare to etalon”.
[TestMethod]
public void CanAddSingleParameterInjectionToConstructor()
{
    var testClassFileContents = @"
using System;
public class FooBar
{
    public readonly FooBar _p1;
    public FooBar()
    {

    }
}";

var testClassExpectedNewContents = @"
using System;
public class FooBar
{
    public readonly FooBar _p1;
    public FooBar(FooBar p1)
    {
        _p1 = p1;
    }
}";

TestUtil.TestAssertingEndText(
                testClassFileContents,
                "FooBar",	// item to click
                testClassExpectedNewContents);
}
Here is the code which will handle the testing. Of most interest to us is the last method. It creates an ad-hoc workspace from our code string, uses it to create context for our refactoring and finally passes the code transformations proposed to the assertion method.
public static void TestAssertingEndText(
                            string sampleClassCode,
                            string refactoringSite,
                            string expectedText,
                            int refactoringNumber = 0)
{
    TestAssertingEndText(
            sampleClassCode,
            refactoringSite,
            actuallText => Assert.AreEqual(expectedText, actuallText),
            refactoringNumber);
}

public static void TestAssertingEndText(
                            string sampleClassCode,
                            string refactoringSite,
                            Action assertion,
                            int refactoringNumber = 0)
{
    //locate the item to click
    TextSpan refactoringSiteTextSpan = GetTextSpanFromCodeSite(
                                            sampleClassCode, refactoringSite);

    TestAssertingEndText(
        sampleClassCode, refactoringSiteTextSpan, assertion, refactoringNumber);
}

public static TextSpan GetTextSpanFromCodeSite(
                                        string code,
                                        string refactoringSite)
{
    var start = code.IndexOf(refactoringSite);

    if (start < 0)
    {
        throw new ArgumentException(
            $"Refactoring site \"{refactoringSite}\" " +
            $"not found in code \"{code}\"");
    }

    var length = refactoringSite.Length;

    return new TextSpan(start, length);
}

public static void TestAssertingEndText(
                            string sampleClassCode,
                            TextSpan refactoringSiteTextSpan,
                            Action assertion,
                            int refactoringNumber = 0)
{
    TestAsertingRefactorings(
        sampleClassCode,
        refactoringSiteTextSpan,
        (workspace, document, proposedCodeRefactorings) =>
        {
            CodeAction refactoring = proposedCodeRefactorings.Single();
            CodeActionOperation operation =
                        refactoring
                            .GetOperationsAsync(CancellationToken.None)
                            .Result
                            .ElementAt(refactoringNumber);

            operation.Apply(workspace, CancellationToken.None);

            Document newDocument = workspace.CurrentSolution
                                            .GetDocument(document.Id);

            SourceText newText = newDocument
                                    .GetTextAsync(CancellationToken.None)
                                    .Result;

            string text = newText.ToString();

            assertion(text);
        });
}

// this method allows us more flexible assertions about refactoring we get,
// i.e. we could assert their count
public static void TestAsertingRefactorings(
                            string sampleClassCode,
                            TextSpan refactroingSiteSpan,
                            Action<AdhocWorkspace, Document,
                                        IEnumerable<CodeAction>> assert)
{
    // Create an add-hoc workspace, as described above
    // (except it also returns Document to save us some code fetching it)
    (AdhocWorkspace workspace, Document classDocument)
        = CreateAdHocLibraryProjectWorkspace(sampleClassCode);

    // Create from it a 'context' for our refactoring to analyze
    // and add possible transformations to
    var refactoringsProposed = new List<CodeAction>();
    Action<CodeAction> proposeRefactoring =
        (x) => refactoringsProposed.Add(x);

    var context = new CodeRefactoringContext(
                                    classDocument,
                                    refactroingSiteSpan,
                                    proposeRefactoring,
                                    CancellationToken.None);

    // Create an instance of our 'Refactoring'
    // and give it the context to analyze
    var refacctoringProviderUnderTest =
                new DiConstructorGeneratorExtensionCodeRefactoringProvider();

    refacctoringProviderUnderTest
        .ComputeRefactoringsAsync(context)
        .Wait();

    // See if the transformation it proposes are what we expect
    assert(workspace, classDocument, refactoringsProposed);
}
Probably the hardest part here is to generate a proper context needed by a particular type of Roslyn-code. Luckily, there is already a project by Dustin Campbell dedicated to unit testing Roslyn, which will do it for you - RoslynNUnitLight
With this setup you are ready to experiment with Roslyn – visually inspect existing code, come up with transformations and test them. In the next part we will see, how programmatic code inspections look like and what goes into those transformation.
